Custom Web Integrations
1. Introduction
The PayToday Web Integration Guide outlines how to seamlessly integrate PayToday’s payment processing capabilities into your website or web application. The guide covers two major integration approaches: the PayToday React, React Native, ,pure HTML/JavaScript SDK for custom integrations and the PayToday payment plugin for WooCommerce on WordPress websites. This document is designed to provide step-by-step instructions for merchants to easily implement and configure the PayToday payment system.
With the PayToday SDK and WooCommerce plugin, merchants can offer a secure, streamlined payment experience for customers. Whether you’re building a custom web application or operating a WordPress-based eCommerce site, PayToday offers flexible solutions for all.
In Scope
This document includes detailed instructions on:
- PayToday React, React Native, and pure HTML/JavaScript SDK: Integration into custom web applications or platforms.
- PayToday WooCommerce Plugin: Installation and configuration for WordPress-powered websites.
Features Covered
- React, React Native, and pure HTML/JavaScript SDK: Integrating PayToday with your web application using JavaScript.
- Environment Configurations: Securely referencing your PayToday keys from various environment variables.
- WooCommerce Plugin Setup: Installing and configuring the PayToday plugin on a WordPress website to accept payments.
- Payment Flow: Creating a payment intent, handling customer redirection, and processing payment status updates.
- Error Handling: How to properly handle and troubleshoot common issues during integration.
Not In Scope
This guide does not cover:
- Other CMS integrations (e.g., Magento, Shopify, etc.).
- Advanced customizations or use cases beyond standard payment processing.
- Reconciliation flows on successful payment; this should be handled by the party performing the integration.
- In-depth troubleshooting of PayToday backend systems (refer to the PayToday support team for backend-related issues).
Whom Is This Guide For?
This guide is intended for:
- Merchants: Who are looking to integrate PayToday as their payment provider on their website or application.
- Web Developers: With basic knowledge of web technologies like JavaScript, WordPress, and WooCommerce, looking to implement the PayToday payment solution.
- Ecommerce Administrators: Managing payment options on a WordPress site using WooCommerce.
2. Prerequisites
Before proceeding with the installation and configuration of the PayToday payment plugin for WooCommerce on your WordPress website, ensure you meet the following requirements:
- 1. WordPress Website with WooCommerce Installed
-
- You need a WordPress website with the Latest WooCommerce plugin already installed and activated. WooCommerce provides the eCommerce functionality that will work with the PayToday payment plugin.
- 2. PayToday Merchant Account
-
- You must have an active PayToday Merchant Account. If you do not have one, you can sign up on the official PayToday Merchant portal at: PayToday Merchant Portal.
- 3. PayToday Credentials
-
- These will be provided to you by PayToday Support team on request via email: paytodaysupport@nedbank.com.na
- 4. Server Requirements
-
- PHP Version – 8.1 or Higher
Authorization & Security
The PayToday Web Plugin is designed exclusively for accepting payments on behalf of a PayToday-registered business. It leverages a three-key system consisting of:
-
- Shop Key: This unique key is required to authenticate your payment requests.
- Shop Handle: Your PayToday merchant identifier, which is specific to your business.
- Private Key: This key ensures secure transactions with PayToday’s API.
Note: The Private Key alone is not functional. It must be used in combination with the Shop Key and Shop Handle to authorize payment requests.
Scope of Authorization
The authorization granted via the Web Plugin is strictly limited to the BusinessPaymentIntents scope. This includes:- Creating and managing payment intents
- Displaying your business name to customers during checkout
No additional access is provided. Specifically, the plugin does not grant access to:
- Business account data
- Transaction histories
- Product details
- Business metrics or earnings
To view any of the above, merchants must log into the PayToday Merchant Portal. Duration of Authorization
Each payment intent is valid for up to 30 minutes. If the payment flow exceeds this duration, a new payment intent must be generated via the PayToday backend to continue.
API Scope Reference
Here is the full list of scopes across the PayToday system. Only one is available through the Web Plugin:Scope Name Descriptions Web Plugin Access BusinessPaymentIntents Create and manage payment requests ✅ Yes BusinessData Access business profile and settings X No BusinessTransactions View transaction history X No BusinessUsers Manage business users X No BusinessProducts View and manage product catalog X No BusinessMetrics View business analytics X No BusinessAccounts Access account information X No BusinessBanks Manage linked bank accounts X No Scope Name: BusinessPaymentIntents
Description: Create and manage payment requests
Web Plugin Access: ✅ Yes
Scope Name: BusinessData
Description: Access business profile and settings
Web Plugin Access: X No
Scope Name: BusinessTransactions
Description: View transaction history
Web Plugin Access: X No
Scope Name: BusinessUsers
Description: Manage business users
Web Plugin Access: X No
Scope Name: BusinessProducts
Description: View and manage product catalog
Web Plugin Access: X No
Scope Name: BusinessMetrics
Description: View business analytics
Web Plugin Access: X No
Scope Name: BusinessAccounts
Description: Access account information
Web Plugin Access: X No
Scope Name: BusinessBanks
Description: Manage linked bank accounts
Web Plugin Access: X No
Security Considerations
- The three-key system only permits payment requests—it does not expose funds or business data.
- Even if these keys are leaked, attackers cannot retrieve sensitive data or access the merchant dashboard.
- Best Practice: If a key leak is suspected, merchants should regenerate their API keys immediately via the Merchant Portal to maintain control over who can initiate payment requests.
Disclaimer
While PayToday implements industry-leading security measures, it is the merchant’s responsibility to securely store their credentials. Keys should never be exposed in client-side code or on unsecured networks.
- 4. Admin Access to Your WordPress Website/Web Application
-
- You must have Administrator access to your WordPress dashboard to install and configure the PayToday payment plugin.
- 5. PHP Version Compatibility
-
- Ensure your server is running PHP version 7.4 or above, as WooCommerce and the PayToday plugin require a compatible PHP version.
- 5. SSL Certificate
-
- For secure transactions, ensure your WordPress website has an SSL certificate installed (this ensures that your website uses HTTPS for secure communication).
IMPORTANT NOTICE.
SANDBOX USAGE DISCLAIMER:
The PayToday Sandbox Environment is configured to process live payment transactions. This is due to the limitations of our payment processing partner DPO, which does not support large volumes of simulated transactions.
As a result, all transactions conducted in the sandbox environment will be charged in real currency. These charges will be refunded within three (3) to five (5) business days for other bank accounts and immediately for Nedbank Accounts subject to standard banking and processing timelines.
By using the sandbox environment and or by following any sandbox-related instructions or implementations outlined in this PayToday Integration Guide, you acknowledge, understand, and expressly agree to these conditions.
You further agree that you assume full responsibility for any charges incurred through sandbox testing.
3. Secure Key Storage
To ensure security, never hard-code your keys directly in your source code. Instead, use environment variables or secure vaults to store sensitive information.
# For example, in a .env file:
SHOP_KEY=your_shop_key
SHOP_HANDLE=your_shop_handle
PRIVATE_KEY=your_private_key
# Then, access these variables in your code:
const paytoday = new PayToday({
  shopKey: process.env.SHOP_KEY,
  shopHandle: process.env.SHOP_HANDLE,
  privateKey: process.env.PRIVATE_KEY,
});
// environment: 'production' — Change to 'sandbox' if needed
4. Integration
The PayToday SDK can be integrated into various platforms, including React, React Native, and pure HTML/JavaScript. Below are the steps for each platform.
4.1 React Integration
To integrate PayToday into a React application, follow these steps:
- Install the necessary dependencies:
npm install axios - Include the PayToday SDK script in your public/index.html:
<script src="https://nedbankstorage.blob.core.windows.net/nedbankclouddatadisk/staticazure/web/sdk/paytoday-sdk.js"></script> - Initialize PayToday in your React component:
import React, { useEffect } from 'react';

const PaymentComponent = () => {
  useEffect(() => {
    const paytoday = new PayToday({
      shopKey: process.env.REACT_APP_SHOP_KEY,
      shopHandle: process.env.REACT_APP_SHOP_HANDLE,
      privateKey: process.env.REACT_APP_PRIVATE_KEY,
      environment: 'production', // Change to 'sandbox' if needed
    });

    paytoday.initialize().then((success) => {
      if (success) {
        console.log("PayToday initialized successfully.");
      } else {
        console.error("Failed to initialize PayToday.");
      }
    });
  }, []);

  return null;
};

export default PaymentComponent;
4.2 React Native Integration
To integrate PayToday into a React Native application, follow these steps:
- Install the necessary dependencies:
npm install react-native-webview - Create a WebView component to load the PayToday payment page:
import React, { useEffect, useState } from 'react';
import { WebView } from 'react-native-webview';

const PaymentComponent = () => {
  const [paymentUrl, setPaymentUrl] = useState('');

  useEffect(() => {
    const paytoday = new PayToday({
      shopKey: process.env.SHOP_KEY,
      shopHandle: process.env.SHOP_HANDLE,
      privateKey: process.env.PRIVATE_KEY,
      environment: 'production', // Change to 'sandbox' if needed
    });

    paytoday.initialize().then((success) => {
      if (success) {
        paytoday.createPaymentIntent({
          amount: 1000,
          invoice_number: 'INV12345',
          user_first_name: 'John',
          user_last_name: 'Doe',
          user_email: 'john.doe@example.com',
          user_phone_number: '1234567890',
          return_url: 'https://yourwebsite.com/return',
        }).then((paymentIntent) => {
          setPaymentUrl(paymentIntent.data.payment_url);
        });
      }
    });
  }, []);

  return (
    <WebView source={{ uri: paymentUrl }} style={{ flex: 1 }} />
  );
};

export default PaymentComponent;
4.3 HTML/JavaScript Integration
To integrate PayToday into a pure HTML/JavaScript application, follow these steps:
- Include the PayToday SDK script in your HTML file:
<script src="https://nedbankstorage.blob.core.windows.net/nedbankclouddatadisk/staticazure/web/sdk/paytoday-sdk.js"></script> - Initialize PayToday and create a payment intent:
<script>
document.addEventListener('DOMContentLoaded', () => {
  const paytoday = new PayToday({
    shopKey: secured_storage.shop_key,
    shopHandle: secured_storage.shop_handle,
    privateKey: secured_storage.private_key,
    environment: 'production' // Change to 'sandbox' if needed
  });

  paytoday.initialize().then((success) => {
    if (success) {
      paytoday.createPaymentIntent({
        amount: 1000,
        invoice_number: 'INV12345',
        user_first_name: 'John',
        user_last_name: 'Doe',
        user_email: 'john.doe@example.com',
        user_phone_number: '1234567890',
        return_url: 'https://yourwebsite.com/return',
      }).then((paymentIntent) => {
        window.location.href = paymentIntent.data.payment_url;
      });
    }
  });
});
</script>
4.4 Error Handling
PayToday provides error messages for failed API calls. Ensure you handle errors appropriately in your code.
paytoday.createPaymentIntent({
  amount: 1000,
  invoice_number: 'INV12345',
  user_first_name: 'John',
  user_last_name: 'Doe',
  user_email: 'john.doe@example.com',
  user_phone_number: '1234567890',
  return_url: 'https://yourwebsite.com/return',
}).catch(error => {
  console.error("Error creating payment intent:", error);
});
- Common issues include:
• Invalid credentials → Ensure correct shopKey, shopHandle, and privateKey.
• Missing required fields → Check that all required parameters are passed.
• Network issues → Retry or check connectivity.
4.5 Return URL Functionality
After payment, PayToday redirects users to your return_url with the transaction status.
Ensure your return URL handles the response appropriately.
// Example of handling the return URL
const urlParams = new URLSearchParams(window.location.search);
const status = urlParams.get('status');

if (status === 'success') {
  console.log('Payment successful!');
} else if (status === 'failed') {
  console.error('Payment failed.');
}
6. PayToday Payment Plugin for
WooCommerce – WordPress Installation
Step 01
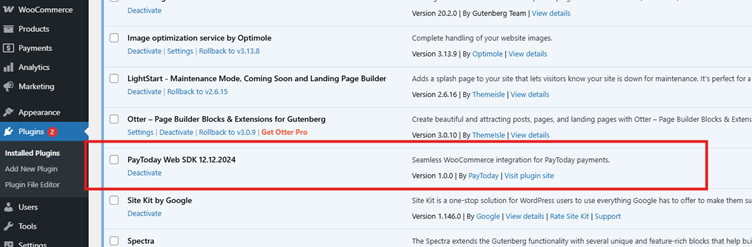
Download the latest PayToday payment plugin for WordPress.
Step 02
Install and activate the PayToday payment plugin on your WordPress Website
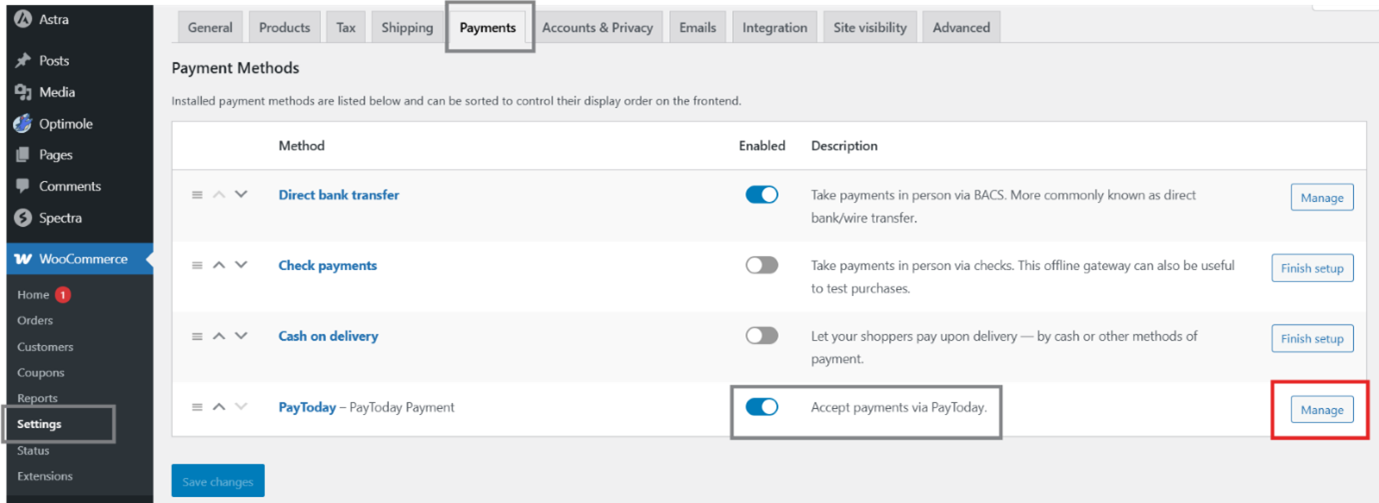
Step 03
On your Administrator panel, click on WooCommerce > Settings >Payments
>> Under Payments, Enable Accept payments via PayToday
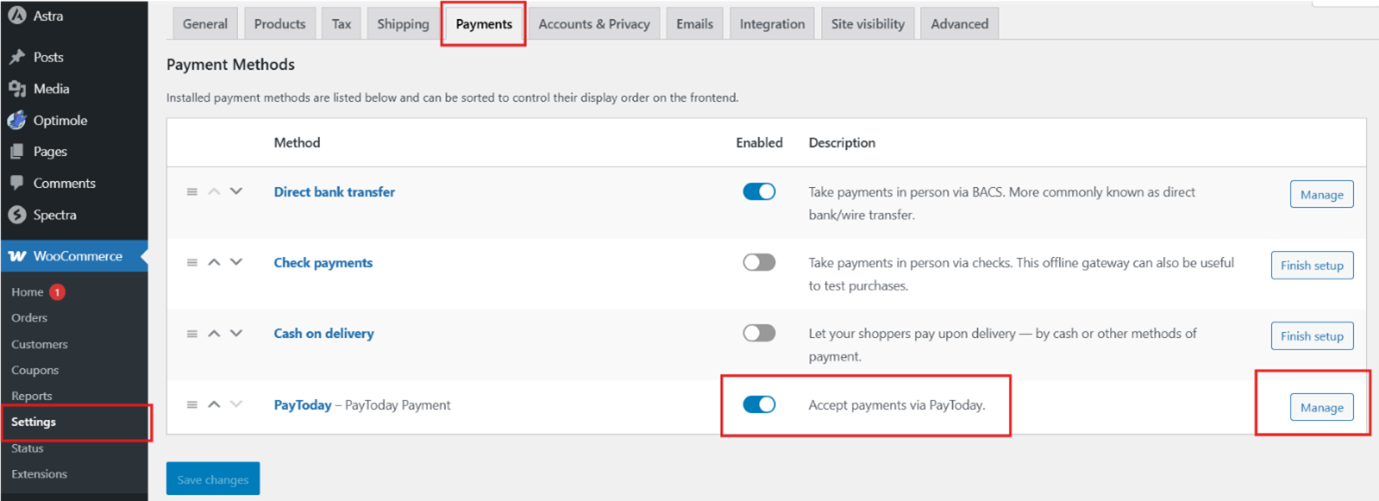
Step 04
Once you enable “Accept payments via PayToday”, click on Manage
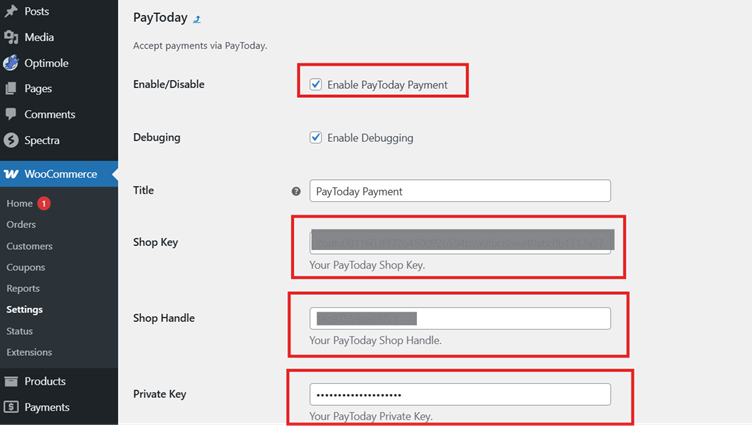
Step 05
Configure the PayToday payment plugin
-
- Make sure to tick under “Enable/Disable”
- Enter the Shop Key
- Enter the Shop Handle
- Enter the Private Key
The private handle, Shop key and shop handle for every business is available upon request by contacting the PayToday support team.
Click save and complete the PayToday payment plugin
7. Conclusion
The PayToday Custom Web Integration Guide serves as a comprehensive resource for seamlessly integrating PayToday’s secure payment processing into your web application or WordPress site. Whether you’re using the React, React Native, and pure HTML/JavaScript SDK for a custom platform or the WooCommerce plugin for WordPress, PayToday ensures that your payment integration is straightforward and effective.
By following the instructions in this document, you will be able to integrate PayToday, configure necessary settings, and begin accepting payments quickly. Should you encounter any issues, PayToday’s support team is available to assist with further troubleshooting and customizations.
8. Frequently Asked Questions (FAQs) for PayToday Web Integrations
- What is PayToday Web Integration?
PayToday Web Integration allows businesses to integrate PayToday’s payment processing into their websites or web applications using the PayToday SDK for React, React Native, and HTML/JavaScript, or via the PayToday WooCommerce plugin for WordPress. - Who is this guide for?
This guide is intended for merchants, web developers, and eCommerce administrators looking to integrate PayToday into their platforms. - What types of integrations does PayToday support?
PayToday supports the following integrations:- React, React Native, and pure HTML/JavaScript SDK for custom web applications.
- PayToday WooCommerce Plugin for WordPress websites.
- What is not covered in this guide?
The guide does not cover integrations with other CMS platforms like Magento or Shopify, advanced customizations, or in-depth backend troubleshooting. - What are the prerequisites for using PayToday?
To use PayToday, you need:- A WordPress website with WooCommerce installed (for the WooCommerce plugin).
- A PayToday Merchant Account.
- PayToday credentials (Shop Key, Shop Handle, Private Key).
- Administrator access to your web application or WordPress site.
- A server running PHP 7.4 or above (for WooCommerce).
- An SSL certificate for secure transactions.
- How do I obtain PayToday credentials?
You can request your PayToday credentials by contacting PayToday Support at paytodaysupport@nedbank.com.na. - How should I store my PayToday credentials securely?
Never hard-code credentials in your source code. Store them in environment variables or a secure vault. - How do I integrate PayToday with a React application?
- Install necessary dependencies:
npm install axios - Include the PayToday SDK in
public/index.html - Initialize PayToday in your React component using the provided API keys.
- Install necessary dependencies:
- How do I integrate PayToday with a React Native application?
- Install
react-native-webviewdependency. - Create a WebView component to load the PayToday payment page.
- Initialize PayToday and create a payment intent using API keys.
- Install
- How do I integrate PayToday with a pure HTML/JavaScript application?
- Include the PayToday SDK script in your HTML file.
- Initialize PayToday and create a payment intent in JavaScript.
- What should I do if I get an ‘Invalid credentials’ error?
Ensure that your Shop Key, Shop Handle, and Private Key are entered correctly and match the credentials provided by PayToday Support. - What happens if a required field is missing in the payment request?
The API call will fail. Ensure all necessary fields (e.g., amount, invoice number, user details) are included in your request. - What happens after a customer completes a payment?
PayToday redirects the customer to your return URL with the transaction status (success or failed). Your website should handle the response accordingly. - How do I install the PayToday WooCommerce plugin?
- Download the latest PayToday plugin for WordPress.
- Install and activate it via the WordPress admin panel.
- Enable “Accept payments via PayToday” in WooCommerce settings.
- Enter your PayToday credentials (Shop Key, Shop Handle, Private Key) and save.
9. Feedback and Support
We value your feedback and are here to assist you with any questions or issues you may encounter. If you require support, please use the following channels:
- Customer Support: paytodaysupport@nedbank.com.na
- Technical Assistance: +264 81 457 8396 (24h)
- Website: site.paytoday.com.na
- Address Nedbank Campus, Freedom Plaza, c/o Fidel Castro & Rev Michael Scott.
- Office hours Mon – Fri (08:00 – 17:00)
Our team provides timely responses to help resolve any challenges you face.
Document Updates
This user manual may be updated periodically to include new features, enhancements, and necessary corrections. To ensure you have the latest version, please refer to the following details:
- Latest Version: v02
We recommend checking for updates regularly to stay informed about any changes.
Legal and Compliance Information
- Copyright: © 2025 PayToday. All rights reserved.
- Disclaimer: This manual is intended solely for training and informational purposes. The content provided is subject to change based on future system updates or modifications.